1) You Can Sketch Too: 1
Introduction.
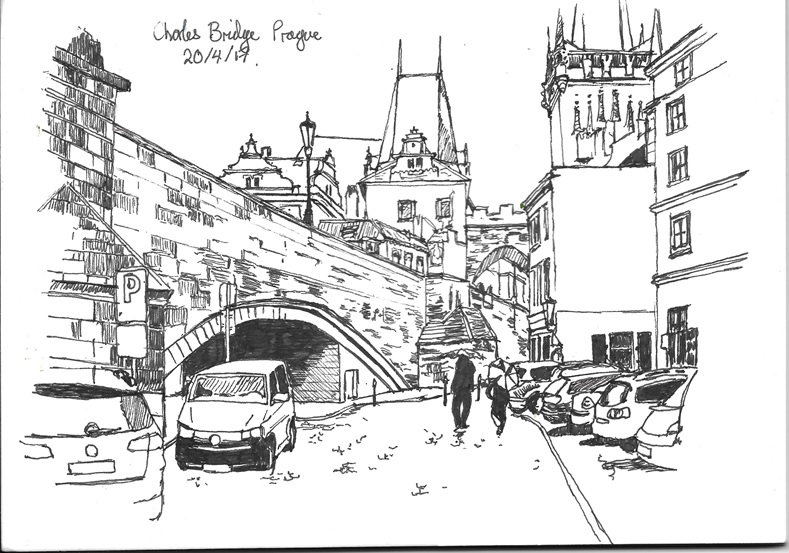
This video is just an introduction to me , where I talk about what Urban Sketching actually is, and my experiences. Here are some of the sketches I show in the video: -

Sketching a Simple Building
This video demonstrates how I make a sketch of a rather simple local building. This is the photograph that the sketch is based on.

This is the sketch I produce on the video: -

You Can Sketch Too: 3 : Perspective
Number 3 is just a short video where I try to explain the basic idea of perspective. It boils down to a few essentials: -
* Pictures which show more than just the one side of a building are far more interesting than straight, front-on pictures.
* To make a building look 3 dimensional you have to consider the perspective.
* This basically means that you try to make the parts of the building or street that are further away look smaller than the parts that are closer. This corresponds with the way that our brains process visual information and helps us to judge depth and distance.
* The angle at which buildings slope upwards or downwards away from you is important. As you move further away from either the streetline at the bottom, or the roofline at the top, the angles of any lines you use should be progressively less severe.
* Distances between windows, for example, should also shorten with distance from the viewer.
* It's worth practising drawing in perspective, since you will become more skilful at judging angles and distances.
You Can Sketch Too 4: Street Scene Part One
This is the first part of a tutorial showing you how to sketch a street scene. This is the photograph I used: -
In this first part we undertake several stages of the picture. |
| Please note that this photograph is my copyright. Fee free to download and print it for the purposes of making your own sketch. For any other reasons all rights are reserved, and you need to contact me. |
* Select a starting point. I pointed out that we can see the furthest tip of the metal railing in the foreground as being about a third of the way up the page, and about a quarter of the way in from the right hand side of the page. I picked this because the top edge of the railing curves down to the bottom left hand edge. Once you've sketched this in lightly, then you have a reference point for everything else in the sketch.
* Another benefit of starting here is that the roofline of the buildings on the right begins almost directly above the furthest point of the railings. Sketch in a very basic outline of the red car above the railing, then make a straight line up for about twice the length of the distance between the top of the railing and the roof of the car. Then begin to sketch in the outline of the roof tops. You have to bear in mind that the paper you're working on is maybe not quite the same proportions as the photo, so don't get too worried if you run out of paper before you've managed to sketch in the whole of the roofline shown in the photo.
* Before we put in any of the detail on the buildings, we want to sketch in the roofline of the buildings on the left. As an aid, and another point of reference, it is useful to sketch in the silver car at this pint. The closest point of the car to the edge of the page is approximately equivalent to halfway along the length of the railings, and the bottom of it is slightly lower than the top edge of the railings on the furthest right. I would leave the buildings at the end of the street, and start with the building which is approximately a car length from the front end of the silver car. Draw the vertical up until it is only slightly lower than the building on the opposite side. Then sketch in the outline of the roofs until you meet the left hand edge of your page. Again, don't worry if you can't get in all the roofs on the original photograph.
* Before you try to sketch in any details of the building it's useful to sketch in where they meet the pavements first. On the left hand side sketch in the line of cars rising slightly beyond the red one. Sketch in the triangular roadsign almost adjacent to the red car. You should see the line where the buildings meet the pavement on the photograph, and sketch this out to the edge of the page. Then also have a look where the kerb line stretches from the red car, and sketch this in. On the other side of your page, lightly sketch in outlines to suggest the line of cars along the street.
* For the last part of this first part of the video, we look at sketching in details of the buildings on the right. The furthest buildings we can just suggest details with a few vertical and slanted lines, where as the closer we get, the more we have to sketch in actual windows and ledges. Pay very close attention to the angles of the lines you are drawing, and think carefully about which areas you want with a dark shading - black - medium shading - cross hatching - and light shading - hatching.
You Can Sketch Too 5: Street Scene Part Two
* Before sketching in the details of the buildings on the left, draw in the windows and lights on the car, and then shade in different areas, using a mixture of shading, cross hatching and hatching where you feel is appropriate. You can lightly sketch in some of the details of the line of cars at this point as well.
* It's up to you now. You could progress to working on the details of the buildings on the left of the street. However you could also start to put the railings in. I'd start furthest away with straight vertical lines, and dark shading on the right hand edge of each line. Remember, the closer you get to the foreground, the greater distance there should be between each individual rail. Also each rail should be a little bit clearer and more distinct coming towards the foreground.
* Using the roofline and the line of cars that you've already sketched in should make it easier for you to judge the lines and angles of window ledges and the tops of frames, and shop signs etc. Work steadily and patiently on applying the details of these to the buildings. Remember that you're not trying to make a photographic representation , so not everything has to be extremely detailed. If you can suggest what's there with a few lines, the eye of the beholder will often do a lot of the rest of the work for you.
* Bear in mind that the left hand side of the street is generally a little darker than the right hand side of the street, so spend a bit of time thinking about how you can use hatching and cross hatching to achieve this effect.
* Once you're happy with the buildings, then take a step back from our sketch and look at it again. Think about how you can suggest the paving slabs, for instance, without having to draw all of them in. Also think about how much of the road markings you want to sketch in.
* All that then remains is to write down where it is, and put a date on your sketch.
This is my finished sketch: -
 |
| Station Road - All rights reserved. If you would like to use this sketch for any purpose, then please contact me at the email address above. |
You Can Sketch Too – 6 – 7 – 8 – Figures
6: The why and the what
This is an introduction to the
tutorial on sketching figures, and putting them into your street sketches.
In this video you see me draw a
couple of typical figures, firstly outlining them, and then shading them in. We
see how rather simple and insignificant the figures look when isolated on a
blank sheet of paper, and then compare them with the same two figures in this
picture.

This is an original David Clark
sketch, and all rights are reserved.
Even simple silhouettes like these
can transform a street scene. By including these two figures in the foreground:
-
· They bring a whole sense of scale to
the picture, and convey something of the siz of the buildings in the street
· Buildings are built to be used by
people, and having figures in our street scene gives it life
· It’s not going too far to say that
the figures turn the picture into a story. Once you look closely you start to
realise that they are boy/man and girl/woman. They are walking together past
what looks like a wedding shop – the name, Perfection, and the dresses in the window
give us the clues. Is this suggesting something about the two of them and their
relationship? What about the fact that they are walking away from us and their
shadows are lengthening? Now, you don’t have to get the story the moment you
look at it, but it’s there if you do start looking closer.
Ideally you want to be able to stand,
or sit, in the open air, and quickly sketch the figures who are there. If we
take the two figures in the foreground here, they were both walking, which
meant that their poses were continually changing. However they were repeating
every other step, and with practice you’ll only need to see the pose repeated a
couple of times to sketch an outline, and then you can spend longer filling in the
silhouette. Practise on your own photographs. The more you’ll do, the more you’ll
get an understanding of the way people move.
You Can Sketch Too 7: Figures Part Two
In this video we start to make a sketch which will feature some figures. At the start of the video we consider several photographs I have taken with figures, discussing each one, before settling on this: -
 |
| This is an original photograph which I took myself. If you wish to download a copy so that you can use it as the basis of a sketch, you have my consent. For any other use, all rights are reserved. |
* Start by measuring out in your mind's eye where you are going to start from. The gable in the centre of the roof of the main building has its apex pretty much halfway across the page. Alternatively the roof of the main building begins in the top left hand corner, and angles down by about 40 degrees to about a third of the way in from the left. I began with this line.
* The front of the building angles down even more sharply, and this is where you can make life easier by sketching in the gable, then bringing down the roof line to meet the bottom left hand edge of the gable.
* You can see there's a white drainpipe coming straight own from the roof, down to just over halfway down the page. If you sketch this in, then it will give you a guide for the corner of the building, for the part where the shop fronts on the ground floor reach, and a point of reference for the tree which is bare of leaves.
* Look back up to the roof. Begin the roof line again from the right hand bottom edge of the gable - it has to be at the same angle as the other side of the gable, although slightly shorter to give a sense of perspective. Now lightly sketch in the edge of the building, down almost to the point where it is level with the drainpipe.
* Take a good look at the photograph again, and now work on the bare tree. Sketch in the outline of the bottom of the trunk first, and then work your way upwards, sketching in and shading the limbs of the tree as you go up. Don't try to copy every little branch you can see, but do try to get in all of the branches coming off the trunk of the tree.
* Have another good look at the photograph. Now try to lightly sketch in the outline of the bushy tree next to the first tree. To do this it would help to sketch in details between the two trees - the shop front, the benches, and the railings around the second tree. Then work your way up, outlining the tree as you go.
* Now draw a simple outline of the figure by the second tree, and darken it to a silhouette.
This completes your work on video 7.
You Can Sketch Too 8: Figures part 3
* Take the sketch you have produced so far, and have another look at the photograph. The next step is to sketch in the outline of the furthest tree on the right. Don't do the trunk area just yet. Sketch in the lamp post as well, from where it touches the tree upwards.
* Now look at the photograph, in particular the large figure cut off at the far right of it. Sketch in the outline of this figure working downwards from his head. Don't worry about the fact that the figure is cut off - this will actually add a little interest and drama to your sketch. Also it may well be that your piece of paper is not the same proportions as the original photograph, and you may find the figure actually being closer to the buildings than on the original. This is fine, and nothing to worry about.
* Shade in the jacket, leaving the hood and the trousers blank. Look at the photograph, and start to sketch the creases into hood and trousers. You can leave the figure like this, or you may choose to darken the trousers with hatching lines - it's up to you.
* Look at the photograph. There is a lower roof stretching from the building into the third tree - you could sketch this in now. When you've done this, then add the two flagpoles rising from it.
* Now finish outline sketching the bottom of the third tree. Add the railings around it, the trunk, and the bench beside it. Also finish the bottom of the lamppost on the right.
* Start to work on the rest of the shop front details now. Notice that there is a figure close to the third tree, and sketch in the outline, then apply shading to silhouette. For the dark doorway behind the figure, you can use hatching. If you keep the hatching lines close together it will appear darker, while the figure will still be discernable.
* Sketch in the details of the windows in the top floor of the main building. Take your time, make sure that the angles at which they slant away from us match with each other. Lightly sketch in the roofs of the bay windows on the floor below. Sketch in all the details of the window behind the bare tree. However the other two bays you can stop sketching them where they meet the outline of the leaves of the other trees.
* Look back at the right hand side of the page. There is a building at the end of the street which projects forward across the photograph - sketch in as much or as little of this as you have room for. This is the far distance in the picture, so you can just use lines to suggest what's there rather than sketching in great detail.
* Now go back to the left hand edge of the building. Sketch in the corner line adjacent to the drainpipe. When you've done that you can sketch in the bench, the lower roofline which adjoins the shopfront and slants upwards towards the left, the poster, and the entranceway to the building. Sketch the outline of the figure behind the bench. Add some creases to his jacket then shade in with hatching lines.
* Put in the large lamp post at the far right of the picture. You can use this as a guide to put in the foliage on the far right, and the building details we can see behind it. Don't forget the ornamental brickwork on the corner of the building. You could put in some horizontal lines on the side of the main building to suggest the brickwork, although I'm not sure that this improved my picture at all, so you might leave these out if you want.
* Sketch in the gutter on the floor, and use a few lines to suggest the paving slabs on either side.
* Now work on the foliage in both trees. Look closely at the photograph to see where the darkest patches between the leaves are. Sketch in approximations of these shapes, and completely shade each one in. Then use light, curving short lines to suggest the shapes of leaves in both trees.
* Before you finish, have a look again at the photograph, then at your sketch to see if there are any details you've missed. When you're happy, write down where the sketch shows and when you made it. Then take a step back and admire your work.
 |
| This is my original sketch, and all rights are reserved |
No comments:
Post a Comment